Streamline Landlord Service (SLS) was created with one goal in mind: make life easier for independent landlords. We’re doing our best to provide you with the tools and services that enable you to run your business efficiently, and without hiring extra help until it’s needed. By providing these tools, we’re able to help you stay organized and keep your mind clear on running the business, or expanding.
The SLS Dashboard allows you to add information on your tenants, rental properties, create rental agreements where you assign one or more tenants to a unit, and handle maintenance requests. In this article, we’ll look at each of these in depth.
Adding Properties
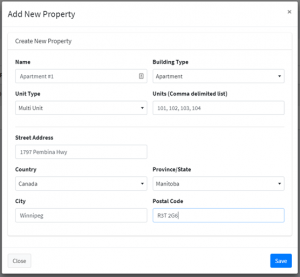
Navigate to the Properties link on the left navigation, then click on the Create Property button. This will bring up a dialog where the property’s information can be entered.
Give the property a name, select the building type, then the unit type. Unit Type means that a property is either a single family home or multi-unit. If the home is multi-unit, you can define the units in the textbox provided. Below that are the street address fields of the building.
Adding Tenants
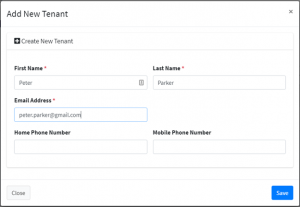
The next step is adding all of the tenants that you have to our system. If there are two people on a lease (for example a couple living in a unit together), then you would typically create an entry for each of them. Let’s create a fictional tenant named Peter Parker and his wife, Elaine Parker.
On the left navigation, click on the Tenants option. Then, click the Create New Tenant button. Fill in the dialog for Peter, then for Elaine.
Once the tenants have been created, the system will check if there are accounts associated with the email addresses entered. If Peter and Elaine have never used the SLS platform before, they likely won’t have an account yet. However, if a previous landlord also used SLS, they may already have an account set up.
If the tenant does not have an account yet, an email is sent to them, asking them to confirm their email address and confirm the fact that they are or will be tenants of yours.
If the tenant does have an account, an email is still sent to them asking them to confirm that they are in fact renting or will be renting a unit from you.
Prior to the tenant confirming their email or association to you, the tenant will have a Waiting status:

At this point, you are able to edit the tenant details if you’d like (e.g. change an email address), resend the confirmation email, or delete the tenant if they are no longer required.
Please note that it is not required that a tenant makes these confirmations or uses the SLS system at all. The advantage to them doing so is they’re easily able to access their documentation for the rental, as well as send you maintenance requests.
This is what the confirmation email sent to the tenant looks like:

As mentioned in the email, the tenant will need to use the Forgot Password function before logging into the account for the first time. The reason for this is that a random password is chosen, and it’s a bad security practice to send passwords through email. So the tenant is able to reset it to whatever they’d like.
Once the accounts have been confirmed, the tenant will now have the Connected status:

At this point, you may now view the tenant’s details, but not edit them. This is because the tenant’s information now belongs to them, and only they can edit it through their account. The delete button is still present, but all it will do now is remove the association between your account and theirs. The tenant’s account will still exist because it is independent from your account now.
Rental Agreements
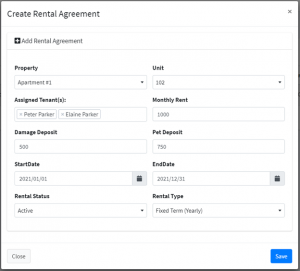
A rental agreement is the process of assigning one or more tenants to a rental unit. In our example, we’ll assign Peter and Elaine to unit 102 of the property we created in the first step. Start by clicking on the Agreements option on the left navigation, then the Create Agreement button.
In our example, I have started by choosing the property. If the property is multi-unit, a drop down list of the available units will appear. Then I assigned both Peter and Elaine and entered in the monthly rent, damage/pet deposit amounts, start and end date to the lease, set it to active, and chose a rental type.
Changing the rental status from Pending to Active allows for a few things. First off, maintenance requests can be submitted by the tenants for this unit. Also, when our pre-authorized debit feature is live, you’ll be able to automatically collect rent.
Rental types are either a fixed term (for example a one year lease) or month to month. Laws vary between jurisdictions, but in general you need to renew a lease within 3 months of it expiring. The SLS system will show you leases that are within 5 months of expiration so you can remember to get the lease resigned for another year. A reminder email is also sent out. With month to month leases, typically 30 days notice is required. Again, please check with your local laws, as this may be different where you are.
You will now see the rental agreement listed and have a few options:
![]()
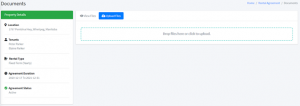
You can edit the details of the rental agreement or delete it and start over. In addition to this, you can also add any documents that you wish to associate with the rental agreement. Click on the action button on the left, which will take you to the documents page. Here you can see a list of any documents you have associated with the rental agreement and add new ones. Since we don’t have any yet, let’s add one. Click the Upload Files button, then select a file to upload.
As an example, I have uploaded a file called Lease Agreement.pdf, which is intended to be a legal lease document.
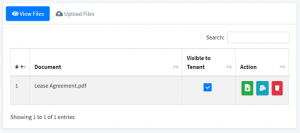
At this point, we can delete the first, download it, or email it out. The email function allows the landlord to easily send documentation to all tenants on the rental agreement. Using our example, the document would be emailed to Peter Parker ([email protected]) and Elaine Parker ([email protected]) for them to review, sign, and email back. At this point, you can also upload the signed version of this document.
This is an example of the email that the tenant will receive:
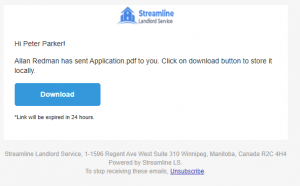
Please note that the download link is valid for 24 hours. If the tenant does not download the document before the link expires, simply email the document out again.
Also notice that there is a checkbox for a column titled Visible to Tenant. Checking this box will allow the tenants to see and download this document if they log into the platform. By default, this is set to off.
Expense Tracker
The expense tracker was built to help you keep on top of all of the various expenses you may incur while renting out your properties. This is intended to make things easy during your annual tax filing.
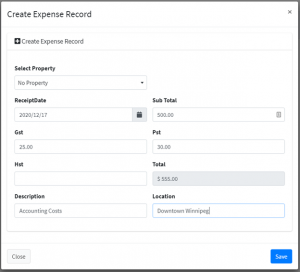
An expense record can be either a general expense (e.g. accounting) or can be associated with a given property or even a unit within a property. To create a new expense record, click the Expense Tracker option on the left navigation, then click the Create Expense Record button.
As an example, I have created an expense for accounting costs. This expense is not associated with a specific property, so I haven’t selected a property from the drop down list.
Once you have created an expense record, you are able to use the advanced search function. This is handy if you have a lot of expenses throughout the year. Filters can be set to search by property, unit, and date range. Use the reset button to clear the filters.
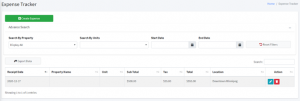
In addition, use the Export Data button to send the current list of expenses to a CSV file. This can be sent to your accountant for tax purposes. Remember that the filters will apply when exporting to CSV. So if you have a certain property selected, only expenses related to that property will be exported to the CSV file. This allows you to easily segregate expenses for your various properties, units, and overall business. You can filter them by the dates to correspond to your tax year.
Income Tracker
The income tracker is very similar to the expense tracker, only it is used to stay organized with all the different sources of income you may have. As a landlord, the most common source of income is going to be from renting out your unit. However, there may be other forms of income such as charging your tenant for an NSF payment. With this in mind, you can create income records by first clicking on the Income Tracker option on the left navigation, then the Create Income Record button.
When the dialog opens, you’ll see that you can associate this income with a property and unit, just like before. There is a date, amount, and description. To make things easier for recurring income (like rent), check the Monthly Income box and choose the month range that this applies to. For example, if you rent out a unit starting on November 1st, 2020 and you want to create all 12 income records for the following year, choose the start as November 2020 and the end as October 2021.
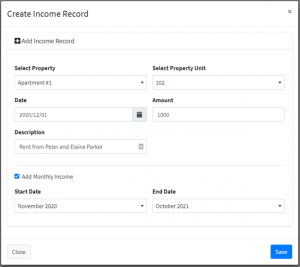
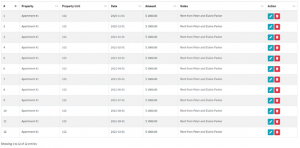
After the Save button is clicked, you’ll notice that 12 income records have been created. This saves us from having to create all 12 income records one at a time. You can edit or delete any of the individual records. Also, the filtering and export functions are present on this page as well to make things easy at tax time.
Maintenance Requests
It’s a fact of life that as landlords, we’ll have to handle maintenance requests from time to time. The SLS platform allows you to receive maintenance requests from your tenants or schedule them yourself. You can send messages back and forth with the tenant regarding what needs to be fixed and schedule a date and time for the repairs to take place.
To schedule some maintenance on your property, click the Maintenance option on the left navigation, then the button to create a new entry. In the dialog, select the property and unit that this applies to.
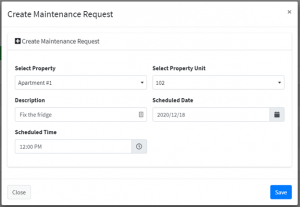
Once the maintenance request has been created, an email is sent to each of the tenants on an active rental agreement. Using our example, both Peter and Elaine would receive a notification that the maintenance has been scheduled and the details.
Once the maintenance request record has been created, you are able to add additional messages. Tenants can reply to the message through the tenant portal. If the tenant has added a message that is unread, an envelope icon will be shown on the row for this maintenance request.
Change the status to Closed when the work has completed. This will allow you to keep a record of all maintenance requests and what was discussed.

Keeping Your Account Safe
In this day and age, keeping your account safe is of utmost importance. The easiest way to do this is to use a password manager (such as LastPass or 1Password) to create and store passwords for all the various sites you use. A great password is a phrase with a combination of letters, numbers, and special characters (e.g. ! @ # $ % ^). Make sure to use a different password for each site that you use on the internet. This may sound difficult, but getting familiar with using a password manager will make this easy and keep you safe.
Additionally, consider adding a second factor authentication to your account. This is an app like Google Authenticator or Authy that goes on your smartphone. When you log onto our site, you will be prompted to enter in a code from this app. This means that in order to break into your account, a hacker would have to have your email address, password, and physically possess your phone. This makes your account a lot more secure than just using a username and password. Just make sure to store your reset codes in a safe place.
Rather than go through all the details of password managers and two factor authentication apps, I’d like to just refer you to a couple of articles which will tell you everything you need to know:
https://authy.com/what-is-2fa/
https://www.lastpass.com/password-manager
Parting Thoughts
We have been working hard to create the tools you need to manage your rental properties. Hopefully this allows you to take on more yourself, so you don’t need to hire outside help. Or, if you’re a property manager, we’d like to enable you to manage more properties in less time.
At the moment, all of our services are free. Everything mentioned above is considered to be part of our base platform and will always remain free. We will be adding in some advanced features such as pre-authorized debit for automated rent collection and background checks for new tenants. These will be paid features which will support the development of the platform.
If you have any ideas for tools or changes that can make your life easier as a landlord or property manager, please let us know! We have a lot of ideas for the future, but we love to get feedback and new ideas.