
Accepting and Configuring Pre-Authorized Debit
Streamline Landlord Service has created a system for integrating Pre-Authorized Debit (PAD) into your workflow. This will allow you to collect rent and one-time transactions such as damage deposits right through the web portal. Once everything is configured, you will receive your monthly rent from each tenant, automatically.
The main topics you’ll need to know about are:
- Registering to Accept PAD
- Managing PAD Permissions
- Configuring Monthly Rent and One-Time Transactions
- Managing Multiple Bank Accounts
- Business Rules and Other Details
- Indicator Icons and Further Enhancements
Getting Started – Registering to Accept PAD
In order to begin the process of setting up PAD for your tenants, we need to get some information about you, the landlord. This information helps us, and our partners ensure that the system is being used properly and only authorized individuals are able to withdraw funds from a tenant’s account.
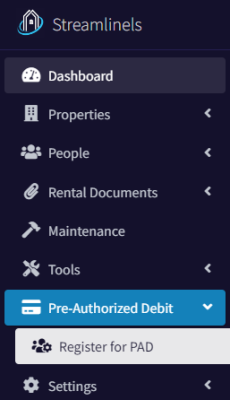
To begin, click the Pre-Authorized Debit -> Register for PAD option on the left navigation, then click the “Start Approval Process” button.
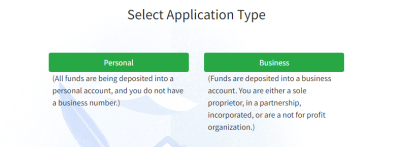
At this point, you’ll need to choose either business or personal. Choose “Business” if the funds withdrawn from your tenant’s accounts are going into a business account. This can be into an account owned by a proprietorship, partnership, corporation, or not for profit entity. If the funds are being deposited into a personal account, with your name on it, then choose the personal option.
Personal Information
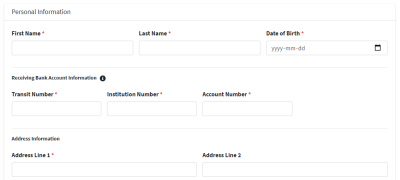
If you chose the personal option, there is a small amount of information we need to gather about you. Essentially, it’s just your name, address, date of birth, and banking information. The banking information is for your account, where the funds will be deposited into.
We also ask what the monthly rent is for you most expensive property. This can be any number, but if it’s over a certain threshold, we need to notify our partners.
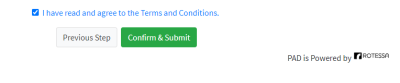
Once you have completed that, review the information on the summary page, accept the terms and conditions, and then submit.
Business Information
If you chose the business option, this means that the funds are being deposited into a business account. In this case, we’ll need to get a little more information about you and your business.
On the first page, you’ll enter your business information. The Operating Name field needs to be the same name that the bank account is registered under. If that’s the same as the business name, that’s okay. Incorporation Number refers to your business number that has been given to you by the Canada Revenue Agency. You must be registered with the CRA, prior to signing up for this system as a business.
In the next section, add the details for your receiving bank account. This is your bank account where funds will be deposited. Finally, enter in the address information for your business.
Add Owners
In this next step, we’ll need to add the personal details for all owners of the business. If the business has more than one owner, click the Add Owner button to enter in their details. There is no limit to the number of owners a business can have.
On the final page, review all of your information. If everything looks correct, accept the terms and conditions, then hit the Submit button.
Validating Identity
Now that we have collected your information, we’ll need to validate your identity. This is done using a company called Veriff. This step is the same, regardless of if you are a business or personal account. If a business has more than one owner, only one owner needs to be validated.
Click the Validate Identity button to begin the process. You’ll need some ID like a driver’s license or passport. Follow the instructions provided. This step is to prove that you are who you say you are.

Getting Approved
Once you have completed the steps outlined above, our partners (Rotessa and Veriff) need some time to process everything. This usually takes one business day.
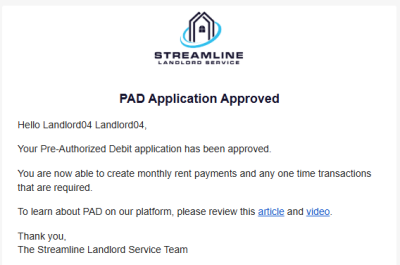
Once your details have been approved, you’ll receive a notification.
Managing PAD Permissions
In order to withdraw money from a tenant’s bank account, you need to be granted permission. In our system, permission is managed on a per Rental Agreement basis. Meaning, if you have permission for one rental agreement, and the tenant leases a different unit from you, you’ll need to collect permission again.
There are two methods of obtaining permission. The first is using our electronic permission form, and the second is to have a physical PAD permission form filled out. We’ll go over both methods.
First, in the left navigation, go to the Pre-Authorized Debit -> Tenant Payments menu item.

Electronic PAD Permission (Option #1)
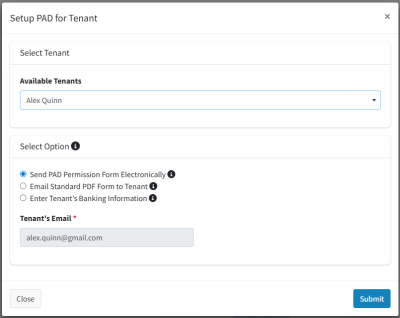
To electronically obtain permission for PAD, start off by clicking the “Setup PAD For Your First Tenant” button. Then select your tenant from the list of available tenants.
A Tenant must have an active rental agreement to use PAD.
Leave the electronic option selected and click Submit.
This will send a notification to your tenant. They are given a form to fill out, which asks for their banking information and permission to allow you to withdraw funds from their account.
They can read the full details of the PAD agreement there. They are also presented with their rights and recourse options, should something be done that is not allowed by the rental agreement.
Once the tenant has filled out this information, you will receive a notification, and they will appear in the Pre-Authorized Debit -> Configure page. From there, you can add the monthly rent payment or any one-time transactions.
Physical Form for PAD Permission (Option #2)
If either you or your tenant like to have physical copies of your records, we provide an easy way to take care of this as well. Choose the second option to send them a copy of the physical form. They can print and either return it to you or simply email it. After you receive the information, it can be entered using the 3rd option, to fill the PDF form.
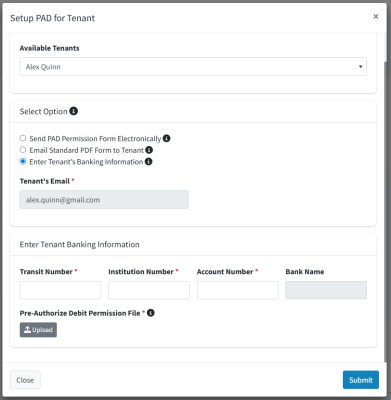
Once you have received the PAD approval form back from your Tenant, enter in their banking information and upload the form. We will review the form on our end and notify you if something is not in order.
Adding Permissions for New Rental Agreements
If this Tenant is moving to a new unit and you need to create a new Rental Agreement for them, you’ll need to add a permission record.
From the Tenant Payments page, find the Tenant in question and select the Banking Details and Permissions option from the Action menu.
This dialog will show all permission records that you have for this Tenant.
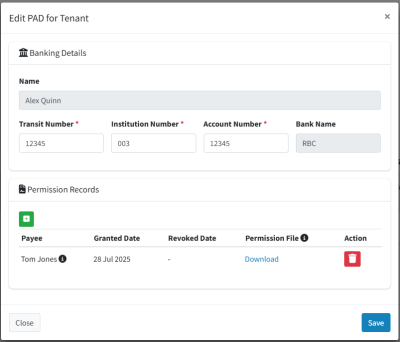
To add a new permission record, click the green plus button. You will be able to either upload a new document or go with the electronic permission option again.
The tooltip will tell you which Rental Agreement each PAD permission record belongs to.
Configuring Monthly Rent Payments and One-Time Transactions
Now that you are authorized to collect PAD payments and have gotten permission from your tenants, you can now set up their monthly rent payments and any one-time transactions.
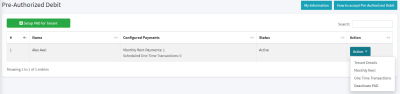
On the left navigation, click Pre-Authorized Debit -> Tenant Payments. You’ll see a list of all tenants that are ready to go for PAD, listed in the table. In the second column, you can see if you have already configured any payments for this tenant.
Click on the Action button in the right-most column. From here, you can view the tenant’s information and change their banking details if needed. You can also create a monthly rent payment, one-time transactions, or deactivate PAD for them.
Monthly Rent Payment
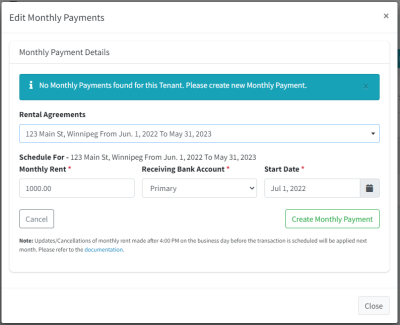
Selecting the Monthly Rent option will bring up a new dialog. Choose the rental agreement that this payment will apply to. From here, you need to confirm the amount, which bank account it is being deposited into (more on that later) and start date and click the “Create Monthly Payment” button. Monthly rent has now been configured.
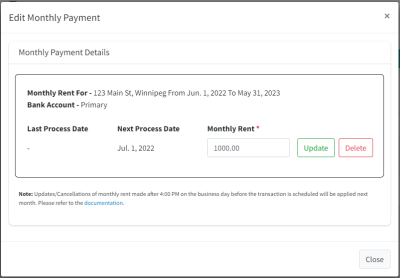
You can return to this dialog to update the rent amount or cancel the monthly payment if you wish. If you are raising the rent, make sure to update the rental agreement first to reflect the new rental amount.
Updating Monthly Rent – Important Note
Transactions are sent from our partner (Rotessa) to the Central Bank of Canada at 4:00 PM CST on the business day before the transaction is scheduled to occur. At this point, we say that the transaction is in-flight.
Once a transaction is in-flight, it cannot be cancelled or modified.
If you update the monthly rent payment during this time, the system will show you a warning message. The warning indicates that since the current transaction is already in-flight, your modifications will be applied for next month. The warning will show until the transaction has completed successfully, five business days later.
Here is a quick example:
Let’s say that a monthly rent payment is scheduled for Friday, September 1st, 2023. If you update the monthly rent between Thursday, August 31st at 4:00 PM and 12:00 PM on September 11th, you will see this warning. There is a holiday on the first Monday of September, so we need to remember that as well.
One Time Transactions (OTTs)
One-time transactions are used for when you need to take a one-off payment for something, like the damage deposit.
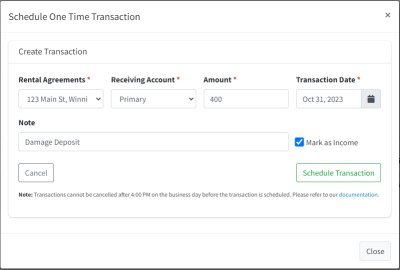
Select the One Time Transactions button for the tenant and this will bring up a new dialog. From the dropdown list, select the rental agreement that this transaction will pertain to. Then, enter an amount, destination bank account, and a date. You can add an optional note (e.g. “Damage Deposit). Then click the “Schedule Transaction” button.
The transaction is now scheduled. Transactions can be deleted up until 4:00 PM CST the business day before they are scheduled for execution.
Marking OTTs as Income
You’ll notice that there is a “Mark as Income” checkbox. Our platform allows you to track income/expenses for your business. Monthly rent payments always create an income record since they will always be income to your business. However, a one-time transaction is not always income. For example, taking a damage deposit is generally not counted as income. However, if the OTT was created to make up for an NSF transaction, then you would want it to be logged as income. This gives you the option to choose what is right for your current circumstance.
Deactivate PAD
If you no longer wish to be able to collect rent or one-time transactions for a particular tenant, use this option. Once confirmed, the tenant will be deactivated for PAD with all future monthly payments and all one-time transactions cancelled. Please note that if there are transactions scheduled for the next business day and it is after 4:00 PM CST, those transactions will still be processed, as they are considered in-flight.
Viewing Transactions
You can view transactions that are scheduled to occur in the future or the status of past transactions. To view the upcoming transactions, on the left navigation go to Pre-Authorized Debit -> Upcoming Transactions. You can change the dates in the Start and End Date fields to go further into the future. The default is 28 days.
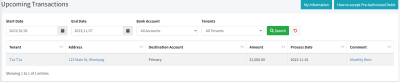
The same process can be used to view the transactions that have already occurred. To view these, on the left navigation go to Pre-Authorized Debit -> Previous Transactions.
Managing Multiple Bank Accounts
Likely, you’re going to have more than one bank account for your operations. Often a landlord may have one for holding the damage deposits, and another bank account for each rental property that they own. How you set this up is up to you and the laws and regulations of your jurisdiction. The Streamline platform allows you to set this up however you need.
To manage your bank accounts, choose the Manage Bank Accounts option under the Pre-Authorized Debit menu item. At this point, you can add another bank account. There is no limit to the number of bank accounts you can add.
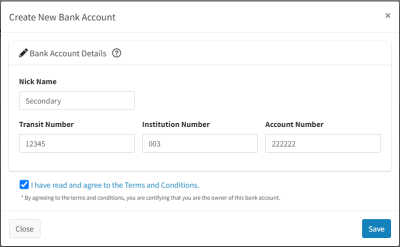
Enter in your new bank account details. Once you click save, the information will be submitted to our partners at Rotessa to enable this for you. You don’t have to go through the process of identifying yourself again, since that was already done.
The approval process may take a few hours, and you will receive an email notification when you have been approved.
Once approved, the bank account status will change from Pending to Approved, and this bank account will be available for you to use for receiving transactions.
Business Rules and Other Details
In this section, we’ll touch on some business rules and other important information that you’ll need to know.
Banking Profiles
When you initially registered for pre-authorized debit, you did so under a personal or business account. If you need to add an additional bank account, it needs to be owned by this same entity.
For example, you can’t register as a business, then add a personal bank account. Nor can you register as person A, then add a bank account owned by person B.
If you need to create a bank account linked to a different entity, you’ll need to create a separate Streamline account, then register for PAD under that entity.
Adding multiple PAD profiles is a feature that we have in the pipeline, and we can merge any new accounts you needed to create later. Please reach out to [email protected] if you need any help with this.
Notifications
There are a number of different email notifications that are sent out, just to ensure that you and your tenants are on the same page with regards to the payments being scheduled. The following notifications are sent to your tenant:
- New Payment Scheduled (monthly rent or one time transaction)
- Payment Cancelled
- Payment Updated (e.g. change the rent amount)
- Banking Information Change (if you were to update the tenant’s banking details)
- Payment Reminder Summary (3 business days prior to the scheduled payment)
- Payment Today Reminder (on the transaction day)
- Payment Status Summary (up to 5 business days after)
And as the landlord, you will also receive these email notifications:
- Tenant Modified Banking Information
- Payment Reminder Summary (3 business days prior to the scheduled payments)
- Payment Status Summary (up to 5 business days after)
Detailed Business Rules
There are a few specific business rules that you may want to be aware of.
- Transaction processing time is five business days. This is typical for any PAD payments in Canada. You will be notified when the status of the payment changes from Pending to Processed.
- The total amount of rent between all tenants on a rental agreement cannot exceed the amount on the rental agreement itself. For example, if you have a rental agreement with a monthly rent of $1,000 and two tenants with PAD configured, the total amount must be less than or equal to $1,000. The amounts don’t need to be equal, and PAD doesn’t need to be set up for each tenant. Each tenant could be $500, or one could be $600 and the other $400. Or you can just configure PAD for one of them and charge the full $1,000. The point is, adding them both up can’t exceed the $1,000 (or whatever amount is on the rental agreement) per month total amount.
- If a tenant has monthly rent or one-time transactions configured for a rental agreement and you remove them from that rental agreement, the monthly payment and one-time transactions will be cancelled for this particular rental agreement.
- If you have PAD configured for a rental agreement and you delete that rental agreement, all monthly payments and one-time transactions are cancelled for all tenants on the rental agreement.
- If you delete a tenant that has PAD configured, all monthly payments and one-time transactions across all rental agreements for this tenant are cancelled.
- If you have PAD configured and decide to close your account, all payments (monthly and one time) will be cancelled, all tenant accounts will be deactivated, and your PAD account will be deactivated as well.
Frequently Asked Questions:
Q: How do I increase the rent?
A: Navigate to the Rental Agreements page and edit the rental agreement for which you want to raise the rent. Change the monthly rent value to the new rent amount. The system will ask if you would also like to update the payment amount as well. For convenience, choose Yes. If you choose No, you can still manually update that on the Tenant Payments page.
Q: Do you do the payment processing yourself or are you working with someone else?
A: We have partnered with Rotessa in order to bring this feature to you. They are the ones who send the transaction to the bank to be processed. We are also working with Veriff, to help validate your identity when getting registered for this service.
Q: How much does PAD cost?
A: Currently, PAD transactions will only be available for premium accounts, which carry a cost of $2 per month per unit, with a minimum account charge of $5. We also offer an annual payment option, where you can reduce the cost to $1 per unit per month.
Q: Are there NSF fees?
A: Yes, if a payment fails due to the tenant not having enough funds in their account to cover it, we will need to charge an NSF fee. This is because the bank charges Rotessa a fee, which is then passed on to us. Please have a look at the pricing section for a complete list of charges.
Q: Are reversals (chargebacks) possible?
A: Yes, a reversal (sometimes called a chargeback) is possible. This happens when a tenant contacts their bank to reverse a Pre-Authorized Debit that has already been taken from their account.
Under Payments Canada rules, tenants generally have up to 90 calendar days from the date the funds were withdrawn to request this.
Indicator Icons and Further Enhancements
As of release v0.6.2 (May 2025), we have added indicator icons to the Properties, Tenants, and Rental Agreements pages. These icons help you see the current status of rent payments, at a glance. This becomes more valuable, the more units you have.
Indicators will only be shown once you have been approved for PAD.
Properties Page

The indicator is the circle, placed just to the left of the property name. In the image above, it is red. Here’s what the indicators mean:
No Indicator – There is no current rental agreement in any of the units in this property. Therefore, no monthly rent payment is required.
Red – At least one unit in this property has an active rental agreement, but no units have a monthly rent payment configured.
Red/Green – Some units have a monthly rent payment, but not all.
Green – All units that have active rental agreements also have a monthly rent payment.
Tenants Page

No Indicator – This tenant is not on an active rental agreement, so does not need to have a monthly rent payment.
Red – This tenant is on an active rental agreement but does not have a monthly rent payment.
Green – This tenant is on an active rental agreement and has a monthly rent payment configured.
Rental Agreements
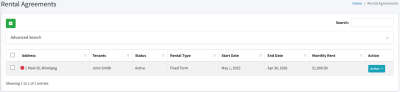
No Indicator – Monthly rent payment is not required on this rental agreement (it’s either pending or finished, or the dates have elapsed).
Red – There have been no monthly rent payments added for this rental agreement.
Red/Green – There have been monthly rent payments added, but they do not equal the amount on the rental agreement.
Green – Monthly rent payments have been configured and are equal to the amount on the rental agreement.